Homography & Warping - OpenCV(C++)
Updated:
D435를 이용해 Homography 행렬을 구하고 Warping 해보기
Visual Studio 2017을 사용하였습니다.
- Realsense SDK 2.0, OpenCV 사용
Homography 행렬을 구하고 Warping하는 것을 구현해보았습니다.
ORB를 사용하여 Descriptor를 구했습니다.
#include <librealsense2/rs.hpp>
#include <iostream>
#include <opencv2/opencv.hpp>
#include <opencv2/core.hpp>
#include <opencv2/videoio.hpp>
#include <opencv2/highgui.hpp>
#include <opencv2/imgproc.hpp>
#include <opencv2/features2d.hpp>
#include <opencv2/flann.hpp>
//#include <opencv2/xfeatures2d.hpp>
//#include <opencv2/features2d.hpp>
int main()
{
	const int width = 848;		// 세로
	const int height = 480;		// 가로
	const int fps = 30;      // fps	=> 선언

	rs2::pipeline p;
	rs2::config c;

	c.enable_stream(RS2_STREAM_COLOR, width, height, RS2_FORMAT_BGR8, fps);		// Realsense D435의 RGB 를 받을 것임을 선언
	// Instruct pipeline to start streaming with the requested configuration
	// Camera warmup - dropping several first frames to let auto-exposure stabilize
	rs2::pipeline_profile profile = p.start(c);									// pipeline에 config 넣고 profile 선언

	cv::Mat frame_Ref;     // References frame
	bool is_applied = false;	// Ref Frame key true / false

	while (true)
	{
		rs2::frameset frameset = p.wait_for_frames();		//Wait for all configured streams to produce a frame

		if (frameset)
		{
			auto color_frame = frameset.get_color_frame();	// Get each frame
			cv::Mat frame_Cur = cv::Mat(cv::Size(width, height), CV_8UC3, (void*)color_frame.get_data());		// Realsense 카메라에서 frame 받아오기

			if (!frame_Ref.empty())		// Ref이미지가 있을 때 실행. 아래에서 c키를 입력받아서 이 if문이 실행되기 바로 이전 frame을 Ref 프레임으로 가져옴.
			{
				cv::Ptr<cv::DescriptorMatcher> matcher = cv::BFMatcher::create(cv::NORM_HAMMING);	// BFMatcher를 사용할 것
				std::vector<cv::KeyPoint> kpRef, kpCur;				// Ref와 Cur에 대한 keypoint
				cv::Mat descRef, descCur;						         	// Ref와 Cur에 대한 descriptor
				std::vector<cv::DMatch> matches;			     		// Matcher를 사용해 2개의 Descriptor를 매칭한 결과를 저장
				cv::Ptr<cv::Feature2D> orb = cv::ORB::create(200);

				// for visualization
				cv::Mat frameMatches;		// Feature matching한 결과
				cv::Mat warping_img;		// warpiing 결과

				/*------------------------------------ Feature Matching ------------------------------------*/

				orb->detectAndCompute(frame_Ref, cv::Mat(), kpRef, descRef);		// Refer frame에 대해 keypoint와 descriptor 추출
				orb->detectAndCompute(frame_Cur, cv::Mat(), kpCur, descCur);		// Current frame에 대해 keypoint와 descriptor 추출

				matcher->match(descRef, descCur, matches);					            // Feature matching

				cv::drawMatches(frame_Ref, kpRef, frame_Cur, kpCur, matches, frameMatches);		// Feature matching 결과를 frameMatches 에 그리기


				/*-------------------------------------- Homography & Warping --------------------------------------*/
				std::vector<cv::Point2f> Ref_pts, Cur_pts;		// point
				const int match_size = matches.size();
				if (match_size < 4)	// true라면 다시 찾아야되기 때문에, imshow("frame_Cur", frame_Cur)로 이동
					continue;

				// matches의 size가 4보다 크다면 아래를 실행
				Ref_pts.resize(match_size);		// matches의 size만큼으로 resize
				Cur_pts.resize(match_size);		//			''
				std::cout << matches.size() << "-----------------" << kpRef.size() << std::endl;
				for (int idx = 0; idx < match_size; ++idx)		// 0부터 matches의 size만큼 반복
				{
					const cv::Point2f Ref_pt = kpRef[matches[idx].queryIdx].pt;		////!< queryIdx : query descriptor index
					const cv::Point2f Cur_pt = kpCur[matches[idx].trainIdx].pt;		////!< pt : coordinates of the keypoints
																					                              ////!< trainldx : train descriptor index

					Ref_pts[idx] = Ref_pt;		// 빈 공간으로만 있던 것들 point 값으로 채우기
					Cur_pts[idx] = Cur_pt;
				}

				// Ref_pts and Cur_pts are vectors of points in source and destination images.
        // They are of type vector<Point2f>. We need at least 4 corresponding points.
				cv::Mat H = cv::findHomography(Cur_pts, Ref_pts, cv::RANSAC);
				std::cout << H;

				// The calculated homography can be used to warp the source image to destination.
        // im_src and im_dst are of type Mat. Size is the size (width,height) of im_dst.
				cv::warpPerspective(frame_Cur, warping_img, H, cv::Size(frame_Ref.cols, frame_Ref.rows));	// warpPerspective 함수는 입력 영상의 점 4개를 출력 영상의 점 4개의 위치로 변환 (투시 변환)
				cv::addWeighted(warping_img, 0.3, frame_Ref, 0.7, 0, warping_img);
				// cv::addWeighted(img1, 0.7, img2, 0.9, 0.0, result);	// result = 0.7 * img1 + 0.9 * img2 + 0.0
				cv::imshow("frameMatches", frameMatches);		// Feature Matching한 결과 보여주기
				cv::imshow("warping_img", warping_img);			// Warping한 결과 보여주기
			}

			cv::imshow("frame_Cur", frame_Cur);				// Cur frame 보여주기

			if (is_applied)		// c키라 눌러져서 is_applied가 true일 땐 (Ref frame 만들기, 해당 Cur frame을 Ref frame으로 만듦)
			{
				frame_Ref = frame_Cur.clone();	// frame_Ref에 frame_Cur을 복사
				is_applied = false;				// is_applied를 false로 변경
			}
		}

		int key = cv::waitKey(10);

		if (key == 'c')				// c키를 누르면 is_applied 를 true로 바꿈
		{
			is_applied = true;
		}
		if (key == 27)			// esc키를 누르면 종료
		{
			break;
		}
	}

	return 0;
}
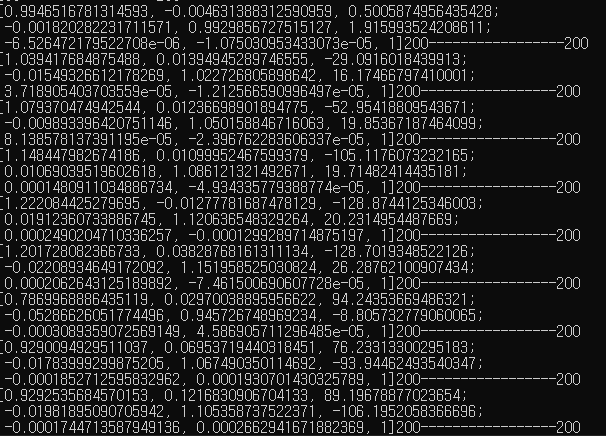
- 추출한 Homography 행렬

매 frame마다 homography가 3x3 행렬로 표현된 것을 확인할 수 있습니다. 우측의 200–200은 제가 size를 확인하기 위해 추가적으로 코딩한 것이니 신경쓰시지 않으셔도 됩니다. homography의 (3, 3)의 위치가 1로 고정된 것은 homography을 구하고 나서 (3, 3)의 값을 모든 행렬의 원소에 나누기 때문입니다. normalization이라고 합니다.
Leave a comment